- Installation
- Adjustment
- Condensation
How To Install Fog Lights
Installing Wiring For Your New Fog Lights


Locate Your Vehicle's Pass Through Hole In The Firewall Designed For Wires To Run Through

If you're adding fog lights to a vehicle not originally equipped with them, you'll need to start by running the wiring for an on-off switch from under the hood to the inside of the vehicle. The easiest and most direct way to do so is to run the wire through the vehicle's firewall. Most vehicles will already have such a hole drilled on the driver's side as a pass-through for other cables, so locate this hole. In the unlikely chance your vehicle doesn't already have a pass-through hole under or behind the dash, you'll need to drill one and install a tight rubber grommet around the wire to seal out the elements.
Connect Your Fog Light Switch

Next, take the black ground wire included for the switch and connect one end to the grounding terminal on the back of the switch. Connect the other one to an unpainted metal section under the dash - you may need to drill in order to create a hole if a suitable one can't be found.
A wire with a fuse connected to it should be included also - these are often red in color. Hook this into the corresponding terminal on the back of the switch, then run the other end out through the firewall hole back into the hood area. The red wire will have a connector piece designed to snap in place with another section of red wire that connects to the relay, then the battery. Connect this last.
Synch Power For The Fog Lights To Your Ignition

Your kit may come with a wire (usually green in color) that's designed to be connected to the ignition fuse inside the fuse box - ensuring the fog lights will only operate when the vehicle's ignition is in the 'on' position. If your fuse box is inside the vehicle, run this wire through the firewall hole. If the fuse box is under the hood, connect it there - the fuse panel cover and your owner's manual should direct you the applicable fuse.
Finally, snap the connectors on each section of the red wire together to bring power to the entire setup.
You'll see black ground wire extensions that came in the kit. Connect them to the matching black ground wires running out of the back of the fog lights, then connect them to an unpainted section of the vehicle frame. Connect (white) power wires together with the matching (white) power wires from each light. After that, connect them to the Y-shaped (white) power wire that's had the other end of it run inside the vehicle.
Performing some of the above wiring work may require use of common electric wiring and cable tools.
Removing A Bumper Cover To Install Fog Lights
If your vehicle was not equipped with fog lights from the factory, it's a good chance the bumper cover already has openings for them or pre-defined cutout areas marked on the inside. Vehicles that have nothing at all will require measuring and cutting by eye.
In order to remove the front bumper cover for any of these jobs, look for bolts and screws that secure it in place. On some vehicles, you'll see attachment points after opening the hood where the top of the bumper cover meets the cowl panel. You'll definitely find securing points underneath the vehicle where the bumper cover meets splash shields and close to the edge of wheel well openings where the bumper cover meets the wheel well liner. If there are flat plastic caps or clips, remove them with a small flathead screwdriver by wedging up.

Remove the bolts with an applicable socket wrench or flat wrench. In the event your vehicle manufacturer has used rivets to secure things, they'll need to be drilled out with a traditional drill. Then you'll need a rivet gun to reinstall new ones - not an expensive purchase, but the proper tool to ensure parts stay safely on.
Once all fasteners are removed, the bumper cover can be detached. Many are designed to slide horizontally along special bracket pieces mounted underneath before coming completely loose, so move the bumper cover in this fashion first if you aren't able to obtain specific instructions on your make and model.
Cutting Holes In Your Bumper Cover To Mount New Fog Lights
If you don't already own a cutting tool, a kit that includes small cutting wheels and all other bits needed to drill, grind, sharpen, and polish to perfection will be invaluable at this point - get one. Once your front bumper cover has been removed from the vehicle, use your fog light as a stencil to draw a line around where you'll be cutting - it's okay to make the hole slightly bigger than the fog light because your add-on kit will come with plastic bezel pieces that mount on the outside of the bumper cover. The bezels will hide any gaps.

Be Carefull! When cut along the lines, then see how the lights and the bezel pieces fit. Install your mounting brackets to the bumper cover with hardware included in the kit, then connect wiring as discussed earlier in the article.

Mounting Universal Fog Light Brackets Directly To A Metal Section Of Your Vehicle
A fog light kit will include universal mounting brackets designed to bolt onto the bumper of your vehicle, to the framework underneath the bumper, or on a cross member just behind the grille. It's pretty much your choice where you wish to put them.

If you've got a grille guard or bull bar mounted on your vehicle already, you'll typically find pre-existing holes along tubular bar sections put there solely for the purpose of mounting lights and other accessories. When drilling into metal is required, it's important to use drill bits rated for metal because they can handle greater levels of heat buildup. Use the size of drill bit specified by the instructions in the kit because you'll want a hole big enough to slide the bracket bolt through, but not so big that that the corresponding nut and washer are loose and wobble.
Next, secure the fog light mounting bracket on the vehicle and tighten all nuts in place firmly. Mount the fog light onto the bracket, then connect wiring to the lights as discussed in the wiring section of this article.

How To Adjust Fog Lights
Fog lights should be mounted on the lower half of your front end. Somewhere on or below the bumper is ideal. They should be around 10 to 24 inches above the ground or at least below your vehicle’s headlights. But with fog lights, lower is better. Since fog usually starts about 2 feet off the ground your fog lights should be below that. If they are higher than the fog the only thing you’ll see when you turn them on is the reflection of your lights in the fog, which is reflected back into your face, making things worse. Kind of like when you hit your high beams in heavy fog. Mount your fog lights under the fog and you’ll be able to see the road ahead.

Tools Needed: Measuring Tape
NOTE! Never use fog lights with high-beam headlamps or auxiliary driving lights as this can blind oncoming traffic.
STEP 1. Park your vehicle on a flat surface with the lights shining on a wall 25 feet away. Not 20 feet. Not 30 feet. It’s got to be 25 feet away for the measurements and lights to come out properly.
STEP 2. Now measure from the center of the fog light lens to the ground. Go put a visible mark on the wall at that exact height.
STEP 3. Adjust the fog lights so they are facing straight forward and the top of the beam is about 4 inches lower than that mark you made on the wall.

This should allow the beams to cut right through the fog like they are supposed to.
Should I Be Concerned About Condensation Inside My Fog Light Assembly?

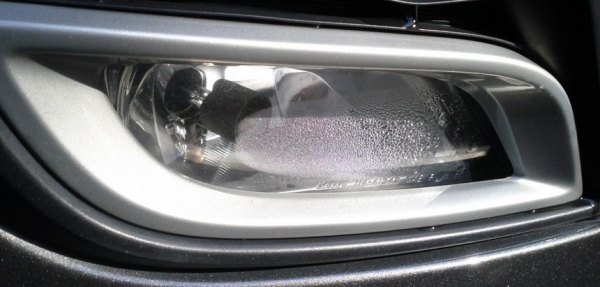
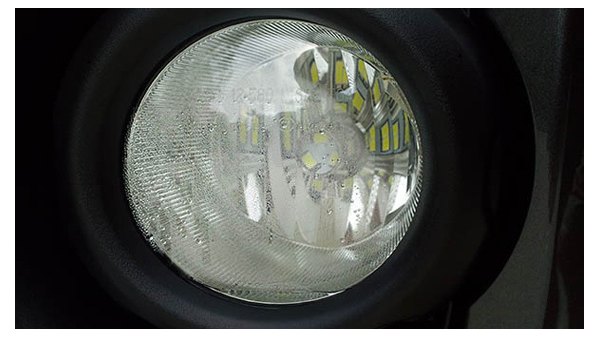
The quick answer to this questions is no. Condensation buildup inside a fog light assembly is normal, and it occurs for a number of reasons. First, vents along the top and bottom of the fog lights housing are necessary to equalize pressure differences that would otherwise cause the entire assembly to crack and fail. Hot fog light bulbs create high pressures inside the fog lights assembly, and temperature differences only increase as lens cover surfaces cool from direct airflow contact at speed.
Condensation does not mean that a fog light assembly is defective, and the presence of fogging or misting due to condensation is not considered a valid reason for warranty replacement of the entire fog light assembly.

If water collects inside your fog light to the point where puddles form, odds are you've got a cracked fog light lens cover or assembly. This is a problem, and must be addressed.
After hot, pressurized air has worked its way out of the fog light through the vents, humidity can get drawn in from the outside. So, fog lights that have been on during hours of driving become fogged on the inside because their cool temperature creates a low-pressure area that actually draws moisture in. This condition is made worse by high outside humidity, and by colder outside temperatures during winter months.
Condensation inside the fog light assembly can also occur in other situations such as a car wash. And it can occur even when fog light bulbs are not turned on. For example, a car that's been driven in the daytime and parked can develop condensation as residual heat leaves the engine and warms the back side of the fog light assembly.
While most condensation in the fog light lens usually dissipates after approximately 20 minutes of driving with the low beams switched on, some small and insignificant areas of the lens may remain misted for a little longer. A normal amount of water condensation inside the fog light assembly will not affect the optical functions of the fog light in any way, and will not cause any parts or wiring to corrode. To minimize condensation buildup inside the fog light, make sure any dust boots or covers are on tightly. Also make sure that the fog light vents are not blocked, which could prevent condensation from escaping.
If water collects inside your fog light to the point where puddles form, odds are you've got a crack in the light lens cover. Water can also leak in because of improper seals around dust boots where bulbs are inserted. If no cracks or holes are visible around the edges of the fog light, the problem could be the housing itself. If you can visibly locate a crack, it's best to repair it with sealant.